Working with Page Settings - Service Catalog
To access the Service Catalog page settings:
1.Log in to Neurons for ITSM Self Service portal, and then change role to Administrator.
2.Click Edit Page at the top right of the window.
The Page Designer opens.
3.Select the Service Catalog page from the Page Selector drop-down list.
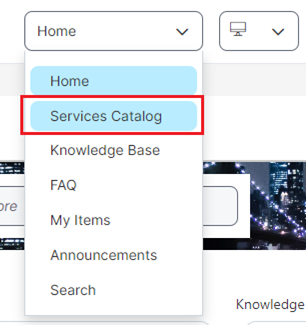
4.Select the page view you want to edit from the View Selector drop-down list - Desktop, Mobile or Tablet.
In Service Catalog you can configure the following:
If a self service user can't find any results on the Service Catalog workspace, they have the option to create a Generic Request. They can use the Generic Request Template drop-down list to select from existing request offerings, form offerings, and external offerings.
To configure a genric request, follow these steps:
1.Log in to Ivanti Neurons for ITSM as Administrator.
2.Click Edit Page. The Page Designer page appears.
3.From the workspace drop-down list available at top center, select Service catalog. The Generic Request Config section is displayed in the left pane.
4.Expand Generic Request config. Select a request from the Generic Request Template drop-down list. The list displays the existing request offerings, Form offerings, and external offerings.
5.Click Publish. A confirmation message is displayed, indicating that the configuration has been published successfully.
The Service Catalog workspace enables you to activate the following features:
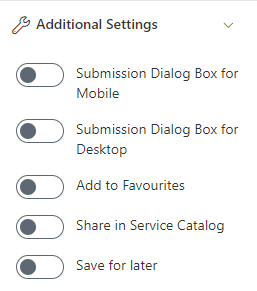
| Feature | Description |
|---|---|
|
Submission Dialog Box for Mobile |
This feature allows you to toggle the display of a dialog box on a mobile device when a Self Service user submits a request or incident from a request offering or form offering, respectively. By default, this option is enabled. If disabled, the dialog will not appear, and users will be directly navigated to the created request page or form offering page |
|
Submission Dialog Box for Desktop |
This feature allows you to toggle the display of a dialog box on a desktop when a Self Service user submits a request or incident from a request offering or form offering, respectively. By default, this option is enabled. If disabled, the dialog box will not appear, and users will be directly navigated to the created request page or form offering page. |
|
Add to favorites |
This feature allows you to toggle the display of a Favorite icon for Self Service users to mark records as favorites. |
|
Share as Service Catalog |
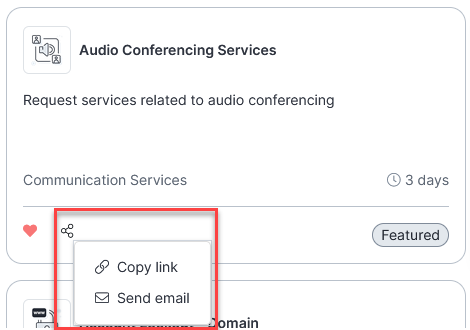
This feature allows you to toggle the display of the Copy link and Send email options, allowing Self Service users to copy the service request link and paste it into another application, such as an email. Additionally, users can directly send the email using Outlook. |
|
Save for later |
This feature enables you to toggle the display of the Save for later option for Self Service users when creating a service request in the Self-Service portal without immediately submitting it. For instance, if you do not have all of the information needed to submit the service request, but want to start the service request, a service request that has been saved for later appears as a draft to Self Service users. |
1.Log in to Neurons for ITSM Self Service portal, and then change role to Administrator.
2.Click Edit Page. The Page Designer page appears.
3.Select the Service Catalog workspace from the drop-down list.
4.Click Page Settings tab, and then click Additional Settings.
5.Under Additional Settings, click Submission Dialog Box for Mobile toggle button to enable or disable the display of the dialog box on the mobile device.
6.Click Publish to publish the configuration.
For a Self Service user if this feature is disabled, the user will be redirected to the submitted item of My Items. While submitting a Service Request or an Incident.
1.Log in to Neurons for ITSM Self Service portal, and then change role to Administrator.
2.Click Edit Page. The Page Designer page appears.
3.Select the Service Catalog workspace from the drop-down list.
4.Click Page Settings tab, and then click Additional Settings.
5.Under Additional Settings, click Submission Dialog Box for Desktop toggle button to enable or disable the display of the dialog box on the desktop.
6.Click Publish to publish the configuration.
For a Self Service user if this feature is disabled the user will be redirected to the submitted item of My Items. While submitting a Service Request or an Incident.
Enabling the Global Constant
1.Log in to Neurons for ITSM as Administrator.
2.Open the Configuration console.
3.Select Global Constants > set the SSMFavoritesEnabled option as True > Save.
Enabling or disabling the Favorite icon from the Page Designer
1.Log in to Neurons for ITSM Self Service portal, and then change role to Administrator.
2.Click Edit Page. The Page Designer page appears.
3.Select the Service Catalog workspace from the drop-down list.
4.Click Page Settings tab, and then click Additional Settings.
5.Click Add to Favourites toggle button to enable or disable the display of the icon in the Self Service portal.
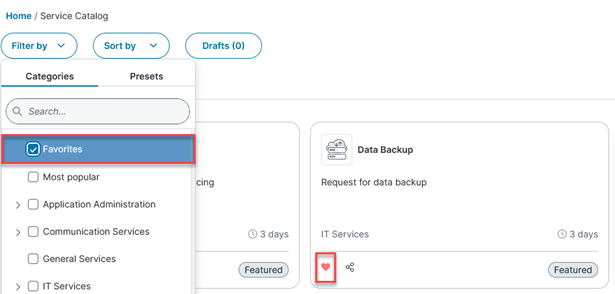
6.Click Publish to publish the configuration. The Self Service user can now click the  icon that appears under each service record and mark them as favorite in the Self Service Management portal.
You can also use Favorites as a filter in your Service Catalog as a Self Service user.
1.Log in to Neurons for ITSM Self Service portal, and then change role to Administrator.
2.Click Edit Page. The Page Designer page appears.
3.Select the Service Catalog workspace from the drop-down list.
4.Click Page Settings tab, and then click Additional Settings.
5.Under Additional Settings, click Share in Service Catalog toggle button to enable or disable the display of the Copy link and Send email option in the Self Service Management portal.
6.Click Publish to publish the configuration. The Self Service user can now view the ![]() button under each service record and use the options in the Self Service Management portal.
button under each service record and use the options in the Self Service Management portal.
Using the share button you can Copy link or Send email to share a service request or an incident.
1.Log in to Neurons for ITSMSelf Service portal, and then change role to Administrator.
2.Click Edit Page . The Page Designer page appears.
3.Select the Service Catalog workspace from the drop-down list.
4.Click Page Settings tab, and then click Additional Settings.
5.Under Additional Settings, click Save for later toggle button to enable or disable the display of the Save for later option for self-service users.
6.Optional. Click Auto Save toggle button to automatically save the service requests after the set interval duration. and set the timeout value (in seconds) in Auto save Interval field.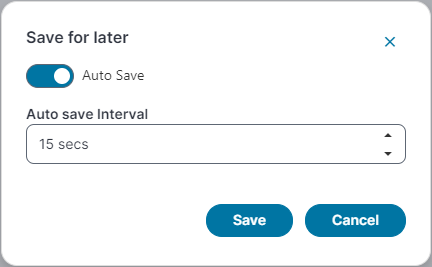
7.Click Save.
8.Click Publish to publish the configuration. The Self Service user can now view the Save as Draft option in the Self Service Management portal.
Also, as a Self Service user, you can access all the draft items in the draft side bar from the Draft button in the Service Catalog page.
